Build, test and deploy Jekyll automatically with Git
In my previous article on how to install a custom plugin in Jekyll, we have added an asset fingerprint plugin. Unfortunately, we need to run manually some commands to build, test and deploy Jekyll to GitHub Pages.
We can avoid this pain by running all the steps when we make a Git commit and push. In this tutorial, we set up a continuous integration and deployment for Jekyll with Travis CI.
Basic configuration
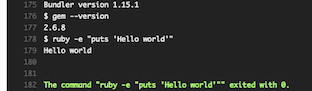
Let's make a Hello world on Ruby with Travis CI. Firstly, we need to create a .travis.yml file and add the following code:
language: ruby

rvm:
  - 2.3.3

script: ruby -e "puts 'Hello world'"

sudo: false
In .travis.yml, we can choose the language and the version we want to use. Here, we will use Ruby 2.3.3. Mostly because Jekyll is written in Ruby. And, we use 2.3.3 because this version is already available in Travis to build environment.
Connect your GitHub with Travis CI
I suppose you have already a GitHub account and a repository that stores your Jekyll sources. You do not have to create an account on Travis CI. Indeed, you need to use your GitHub login in order to connect on Travis CI.
In your Travis dashboard, it will show all your repositories that have a .travis.yml file and you can enable the project you want to build.
Now, you can commit the previous file and push it to your repository. Then, we need to enable the test launch and you should get this result:
Continuous integration
The first step of the script is to build our Jekyll site automatically after pushing a commit.
In my previous, we have already implemented a Rake task to build Jekyll. So, the only thing we need to do is to replace Hello World code by:
script: bundle exec rake jekyll:buildAfter building our Jekyll, we need to test if the files are correctly generated. Same here, we have already a Rake command to test if Jekyll is generated properly:
bundle exec rake test:htmlThen, the script line becomes:
script: bundle exec rake jekyll:build && bundle exec rake test:htmlBasically, the previous code means we want to build Jekyll. If there is no error in the build, we want to check whether generated files are good or not.
Continuous deployment
Travis CI has already provided a method to deploy easily on GitHub Pages. In your travis.yml file, you need to add the following configuration:
deploy:
  provider: pages # Upload to GitHub Pages
  skip_cleanup: true # Prevent Travis deleting generated files
  local_dir: _site # The Directory where output files are generated
  github_token: $GITHUB_TOKEN # Set in travis-ci.org dashboard
  on:
    branch: master # Name of the branch we want to test
How to get a GITHUB_TOKEN
In your GitHub account settings, there is a link named Personal access tokens:
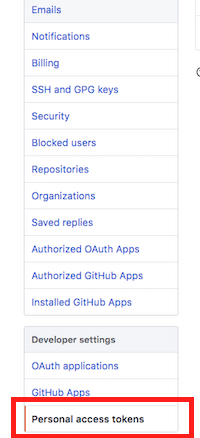
After clicking on it, you will see a button generate a new token:
![]()
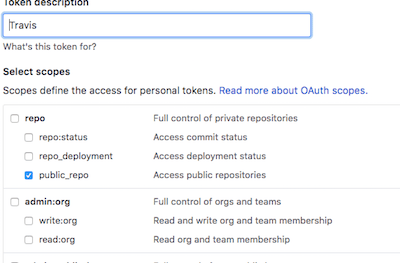
You will redirect to a new page. You have just needed to fill the form by entering a token description and enabling public_repo if your Jekyll repository is open source. Otherwise, you need to click on repo checkbox.
After submitting the form, you will see the token number and you can copy the value. Then, in your Travis account, go to the build of your Jekyll and find the Settings link:

Finally, in the Environment Variable section, add a new key named GITHUB_TOKEN and paste the GitHub token:

Conclusion
If you have followed all the previous steps, you are now able to make a commit and push to your GitHub repository. It will automatically trigger a build on Travis and if there is no error, it will also deploy on GitHub Pages. Love automation!
By implementing a continuous integration and a continuous deployment, you are not anymore annoyed by manual steps.